Slugging the Bore
By: Pilgrim (a.k.a. Duane Bogen)
Your first thought is probably WHY? I’ll get to that in a second. The first rule I want you to remember is …THERE ARE NO RULES! Cast bullets in rifles and handguns are both a science and an art. What works for one may not work for another.
So, why slug the bore? The relationship between the cast bullet and the dimensions of your firearm is critical to performance. If you don’t know what the dimensions are in your firearm (pistol, revolver, or rifle) you begin with a handicap. Due to the consistency of modern manufacturing, sometimes this handicap is no big deal. On the other hand, there are always exceptions to the rule. If you are like me, those are the firearms you seem to buy. Karma, or lack of karma, luck, or whatever you wish to call it plays in this sport as much as it does in poker. Some folks have it, and some don’t. I’m in the latter category. If you are in the former category, further reading of this section is probably not necessary. However, the knowledge you will gain might help you in the future when you run out of luck. Trust me in this, if you buy multiple firearms and stay in this sport long enough, you will run out of luck eventually!
Generally, for accuracy and always for prevention of leading of the firearm, you want a cast bullet that is larger than the internal dimensions of your chamber/barrel. Revolvers have a few more critical characteristics that pistols or rifles and we’ll get to that in a bit. One other caveat that I will throw in here is that we are discussing loading cast bullets over smokeless powders. Black powder shooting operates to a different set of rules and we’ll leave that subject to the Sam Fadalas and Mike Venturinos of this world.
Groove diameter is the dimension between the bottoms of opposing grooves. Bore diameter is the dimension between the tops of opposing lands. For example, the bore dimension of a .30 caliber rifle is usually .300”, with a groove diameter of .308”. For this hypothetical rifle, you would select a bullet that has a bore riding section (nose) of the bullet that casts at least .300”, with .301” better, and larger than .301” is oft times better yet. This portion of a bullet is called the bore riding section or nose. For this rifle, the base section of the bullet should be at least .309” as cast. Again, larger is better because you can always size the bullet down with standard sizer-lubers with minimal or no damage to the bullet, if you are careful. Bumping a bullet up to make it larger in diameter can be done, but usually requires a swaging die to accomplish this uniformly. Again, for this hypothetical rifle you would want a bullet that casts a base of .309”, minimum, and a nose of .300”, again minimum.
If you have a firearm with an uneven number of grooves/lands, measuring it is not easy and requires special tooling. Smith and Wesson are famous for this as their barrels are 5 grooves. For these firearms, ask the manufacturer of your firearm what the nominal barrel dimensions should be for their acceptance check. If they can’t/won’t tell you, generally assume the nominal dimensions (published in the Lyman Cast Bullet manual and other places) and start there. For example, I noted the standard .30 caliber barrel is a .300 bore, and a .308 groove. For a .25 cal barrel, the standard is a .250 bore and a .257 or .258 groove. Generally American firearms have groove depth of .004, but not always. Sometimes the groove depth is .003. Usually, the larger the number of grooves the firearm has, the shallower will be the rifling. An example of this is the Marlin micro-groove barrels. If you have the problem of a barrel you can’t measure because of the odd groves, start with the nominal dimensions of the cartridge +.001” and go from there. If you err, err on the large side.
If you want to avoid the risk of buying “stuff” that you may not use in the future, you can usually order cast bullets from a commercial manufacturer to a specific size. You can buy bullets of various diameters and see which works the best in your gun and bypass all the folderol to follow. You won’t have as much fun, or be as knowledgeable, and you will be poorer due to the buying of commercial bullets, but you will have your answers in due course. However, if you prefer the more fun and inexpensive route to enlightenment, read on. Besides, if you haven’t figured it out by now, bullet casting is a virus for which there is no antidote. You will buy moulds for which you have no firearm. Why? Beats me. I do it. We all do it. A good mould at a good price is nice to have, “just in case”.
Pistols have essentially the same requirements as rifles. As long as the bullet is large enough to fully fill the bore, plus a smidgeon, you are in good shape.
Revolvers add some complication to this bullet dimension question. In a revolver, bullets must pass through the throat of the chamber, across the barrel – cylinder gap, then through the forcing cone of the barrel ahead of the chamber, and finally down the barrel. The dimensions of each of these points will affect the performance of your revolver. In recent years it has become commonly known that the relationship between chamber throat and bore is critical to success with cast bullets. The Cowboy shooters have helped the rest of us tremendously in this regard. Just as the Silhouette shooters resulted in stronger, more accurate revolvers, the cowboy shooters have helped us in obtaining proper dimensions in currently manufactured revolvers. In general, the best relationship between these dimensions is that the cylinder throats should be ~ .001 larger than the groove diameter of your revolver barrel. The cast bullet should be no smaller than the largest throat diameter in the cylinder, and .001 larger is better. The result of this dimensional arrangement is that the bullet will seal the chamber throat, and then be swaged down ~ .001 passing through the barrel forcing cone, and remain at that dimension for the rest of its journey. This will result in the bullet fully sealing the bore throughout from the case to the muzzle. This is necessary not only for accuracy, but to prevent leading. The expanding powder gases will seek any avenue for escape. If the bullet does not completely seal the bore, the combustion gases will pass between the bullet and barrel and this will result in gas cutting of the bullet base. This is essentially identical to what you see when a cutting torch is used to cut steel. The metal removed from the base will deposit on the bore (or chamber throat, or forcing cone, or all three depending upon the bullet alloy and dimensional characteristics of the firearm and bullet). The net effect is the revolver throat/forcing cone/barrel will be leaded, ruining any chance for accuracy with that and subsequent bullets.
The barrels of revolvers can be “pinched” at the junction of the barrel and receiver/frame. This happens when the barrel is screwed into the frame tightly. The pinch point can be removed, but that is another topic in itself and is addressed in the chapter on Fire Lapping. If this condition exists in your revolver, the bullet will again be “swaged down” in size at this point. Oft times it doesn’t result in much, if any, leading of the barrel, but accuracy is not as good as it can and should be.
There are three ways to slug the barrel of a rifle/pistol. One method is relatively easy, while the other two methods are the easier and easiest way.
The first method involves the use of a metal called Cerrosafe. This metal can be purchased from Brownells. It melts below the boiling temperature of water and has near perfect expansion characteristics. To use this method you first must form a plug in the barrel of your firearm. This can be done at the muzzle by pushing a tight patch a couple of inches down the barrel. After melting the Cerrosafe (Melt it in a small pan, with the small pan floating in a larger pan of boiling water.) it is carefully poured into the barrel and allowed to cool. The other method of using Cerrosafe is to form the plug an inch or so ahead of the chamber of your firearm. Then pour the Cerrosafe into the barrel from the breech end. Again allow the Cerrosafe to cool and set up. This second method will give you the dimensions of your chamber, the chamber throat, and the barrel ahead of the throat. The risk of the second method is if you pour too much Cerrosafe into the breech end of the firearm and it fills in the area of the bolt lugs or extractor, the Cerrosafe isn’t coming out unless you melt it out. As the Cerrosafe melts at such a low temperature it isn’t all that bad to have to melt it out of the breech, but it is a pain in the butt. Note here that if you are trying to determine the dimensions a firearm for which you cannot access the breech (pumps and auto rifles for example) then Cerrosafe is not for you. You won’t be able to push the plug out of the barrel end, or pour the Cerrosafe into the breech end of the barrel. For these rifles go to plan B which is described below.
After the Cerrosafe sets up, but before an hour has passed you must push the casting out of your barrel. If you used the muzzle cast, push using a cleaning rod from the breech, and vice versa. The reason you must remove the Cerrosafe before an hour has passed is its expansion characteristics. After it is cast, the metal will shrink about .001”, which makes it relatively easy to remove from the firearm. After about an hour, it expands back to the dimensions of the original cavity. Thus, remove it soon, and measure the dimensions after an hour or so and you will have the dimensions of your barrel and/or chamber/throat/barrel.
The following two photos are provided by waksupi (Ric Carter) of his .358 Win. The second photo is provided by floodgate (Doug Elliott) of his Evans. You will be able to measure all of the needed information from these casts. READ the instructions that come with the Cerrosafe. There is a specific time at which to measure the casting to get very accurate measurements. In reality, for cast bullet purposes as you are going to want the bullet larger than the smallest dimension, so when you measure for CBs it’s not as critical as for other uses of this data. However, if you are going to go to the trouble of making the cast, get all of the info as accurately as you can in the first place. Then you won’t have to repeat the casting at a later date if other information becomes needed.
Barrel Lands Grooves Throat
Neck Shoulder Chamber![]()
![]()
![]()
![]()
![]()
![]()
.358 Winchester Chamber Cast
Chamber Lands Grooves![]()
![]()
![]()
Evans Chamber Cast
The other two methods of slugging your bore involve the use of soft lead. This can be of the form of egg sinkers from your local sporting goods store, or lead bullets from your mould, your friend’s moulds, or commercial sources. I believe LBT sells a bore slugging kit that contains several soft cast bullets that are oversized for the nominal barrel dimensions of your rifle pistol. Others may as well, but I am not aware of them.
The manual method of bore slugging uses the egg sinkers or oversized cast/swaged lead bullets. Make sure your barrel is clean and free of all fouling. If you don’t do this you will not get accurate information. Lightly oil the bore with a cleaning patch wetted with WD-40 or other light oil. All you are doing with this oil is lightly lubricating the barrel so you can push the slug through more easily. If you are using an egg sinker, choose one that is larger than your bore, but relatively close in diameter. You don’t want to pound a ¾ oz sinker down the barrel of your .25-06, for instance! It probably won’t damage anything but it won’t be easy…even if it can be done. If you are starting the slug from the muzzle, use a rubber mallet or leather mallet for forcing the lead slug into the barrel of your firearm. You don’t want to damage the crown, so be careful! If you choose to use an egg sinker, this is about the only way you can go. If you are using a bullet, and have access to the breech end of the barrel, start at the breech end as the chamber throat helps align the bullet as well as swaging it as it passes into the barrel. If you start at the breech end, use a cleaning rod (one piece) or dowel (aluminum or brass dowel is better) that just barely fits into the barrel. You don’t want to scratch or damage the barrel in any way. If the rod you are using flexes and rides against the barrel, you run the risk of damaging the barrel as you force the bullet/slug through the barrel. After it has been started, from either end, you will use a cleaning rod or dowel to push the slug through the remainder of the barrel. Eject the sized slug onto a soft surface. A rag makes a nice landing spot for this soft slug. Using a micrometer (best) or a caliper (OK), measure the bullet at its widest point. This dimension is the groove diameter of your barrel. The smaller of the measurements of that engraved slug is the bore dimension. These two dimensions essentially tell you what you need to know about your bullet mould and the bullet dimensions after sizing and lubing.
The other way of slugging the bore is using a loaded cartridge and firing the slug into a soft pile of folded towels. You will have to load these cartridges yourself, or get your loading buddy to help you as nobody sells them. I generally use very small charges of Bullseye powder. For pistol cartridges (.38 and up) something on the order of ½ gr. of Bullseye under an unsized bullet generally works OK. It is advisable to do this outside with dirt under the towels. The reason is obvious. If you use too much powder, the bullet isn’t going to stop in the towels. I can’t tell you how much powder to use as the dimensions of your firearm, cartridge, and the bullet will determine this. If you start too low, you will have to push the bullet out of the barrel. This isn’t all bad as if it has traveled part way up the barrel the bullet will have engraved the barrel and it will give you the needed dimensions. If this happens, push the bullet from the muzzle to the breech. If you use too much powder, the bullet will pass through the towels and go on its merry way. In that case you can load another case up and do it again. It is advisable to use less powder the next time or you will find that slugging your barrel is a time consuming task. If you fall into the category of being a really slow learner, you might want to consider other sports. Please do not start bullet casting, or reloading, and in fact maybe you should take up tennis or some such.
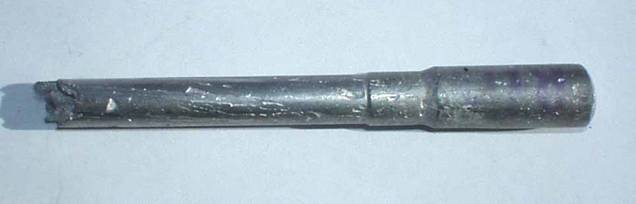
For rifles in the .30-30 class something on the order of 1 gr. of Bullseye is about right. Obviously as the case gets bigger you will need more powder. However, remember my admonition. Do this outside, over dirt! I last slugged the bore of my Remington Model 14 .25 Remington. The .25 Remington is a cartridge that is slightly larger than a .25-35 Winchester, and of the .30-30 class of cartridges. I started with ½ grain of Bullseye and the bullet barely made it out of the case. It hadn’t gone far enough into the barrel to give me the dimensions I needed. So I loaded a second case but used 2 grains of Bullseye. Two grains isn’t very much powder. That should be safe and about right, I thought. That bullet went through a one-foot thick pile of towels and I couldn’t find it in the ground. I stopped digging after 3 or 4 inches as even if I found it, it would have been distorted and of no use. Retreating back to my loading room, and telling nobody of the deed, I loaded the third cartridge with 1 gr. of Bullseye. This time the bullet penetrated through all but one layer of the towels. A bit of overkill, but not too much as I was able to retrieve and measure the bullet dimensions. I personally prefer this latter way of slugging barrels. It works for rifles or pistols, and is fast, easy, and doesn’t risk damaging the barrel in any way. Pounding the slug through a barrel runs the risk of scoring the barrel, or “peening” the lands with the rod or the crown with the mallet. The photo below is of a bullet before and after firing it through the .25 Remington. This one was of the third attempt {:o). Note the places where you will take your measurements.
Before Firing After
Firing Measure here (either or both) for the Groove
diameter. Problem ! The nose of this bullet was not large
enough to engrave on the lands. If it had engraved, this is where you
would measure the bore diameter.


.25 Remington Bore Slug
The above methods won’t work for revolvers as there are a number of places in a revolver where the bullet can be sized down and the needed data won’t be available in all cases. For this reason, revolvers are a case unto themselves.
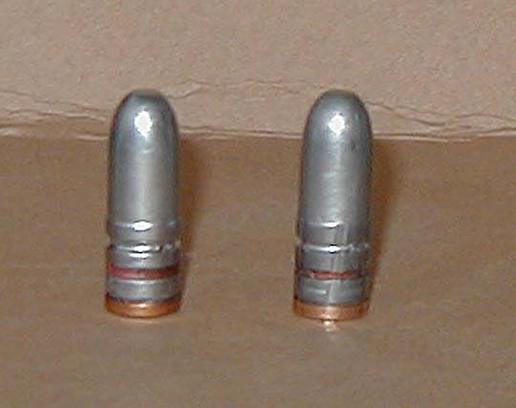
The easiest way of resolving the question of bullet size for the chambers of your revolver is to push your bullet, unsized, through each chamber throat and measure them. If they push through easily, your bullet is undersized. You should feel resistance to be sure you actually are swaging the bullet down in size. If you have the tools (hole gauges) you can measure the throats directly without the use of a lead slug.
Measuring the barrel pretty much requires you to force a soft lead slug from the muzzle to the breech of the barrel. You can’t trust the method of firing the bullet down the barrel as the bullet will assume the smallest dimension, which may not be the barrel. You also can’t push a slug through from the breech end unless you remove the barrel from the frame. Finally, when pushing the slug down from the muzzle, be careful when you reach the area near the barrel frame junction. If you feel additional resistance here, you are measuring the barrel dimensions of the pinch point, and not the barrel itself. In this latter case, go read the chapter on fire lapping. Remove the pinch point, and then come back to this chapter and finish slugging the barrel.
If you were fortunate, the groove diameter of your barrel is equal to or smaller than the smallest throat of the chambers in your cylinder. However, if the cylinder throats are several thousandths bigger than the barrel, don’t give up yet. Go shoot the gun and see what happens. Sometimes the revolver will group well despite this dimensional difugalty. It is unlikely to give leading problems if you use a good lube and a bullet of correct hardness, and as long as the bullets are as large as the largest throat. Remember …there are no rules! If the revolver gives you poor accuracy, you are stuck. Return the revolver to the manufacturer for a new cylinder, find a cylinder with smaller dimensions and have your local gunsmith install it, or get rid of the gun. Other than chambering the gun to a larger caliber and rebarreling, there are no other options of which I am aware. If the cylinder throats are smaller than the groove diameter of the barrel, that is fixable. First however, go shoot the gun. If it ain’t broke, don’t fix it! If the accuracy isn’t there and you want to increase your chances of obtaining accuracy, your local gunsmith should have, or can acquire the needed reamers to fix the problem. Remember…you are looking for the throats to be ~ .001” larger than the groove diameter of your barrel and your bullets should be ~ .001” larger than the throats. For example, my .45 Colt is a Ruger Bisley. Ruger was/is notorious for making .45 Colt revolvers with .450” throats. The nominal barrel dimension for a current .45 Colt is .452”. This dimensional problem often resulted in poor accuracy and barrel leading in the forcing cone and barrel of those revolvers. The problem was so common, that Brownells started making and selling .4525” reamers specifically for these Ruger revolvers. This was what I did. I had the chamber throats opened up to .4525” - .4530”. That fixed the problem.
As a result of this dimensional problem with the Ruger revolvers, the cowboy shooters began to buy imported revolvers. And lo and behold, Ruger saw the light and changed their dimensions. This is how the Cowboy shooters have helped us lead bullet users. Cowboy shooters are required to use lead. If the manufacturers want to sell guns to this large market, they had better change to make firearms that are lead bullet friendly. Similarly, Marlin was forced to switch to Ballard style rifling for their “cowboy” guns because accuracy with micro-groove barrels and lead bullets is a sometime thing. If you know a Cowboy shooter go hug ‘em for me.
The final topic of slugging your firearm has to do with the throat dimensions. I will tell you how to do this, but personally have never done it, and doubt I ever will. LBT (Veral Smith) made a big to-do about this dimension. He felt that your bullet to chamber throat fit was the most critical dimension. He also sold a whole bunch of moulds he manufactured to meet this “need”. Personally, I buy readily available moulds (generally RCBS, SAECO, and Lyman) and seat the bullets into the lands. I get accuracy that is acceptable to me and I seek no more. Those advocates of matching the bullet to the throat have had excellent success and would consider me to be a heathen. You’ll have to decide this one on your own as I can’t help you.
To slug the throat of your chamber you need to use a cartridge case that has been filled with something. That something could be lead poured into the case and then filed flush with the case mouth, epoxy, or some other hard and strong material. Chamber the modified cartridge case and then push a soft lead slug down the bore from the muzzle. When the bullet contacts the seated cartridge you will then “pound” the soft slug against the cartridge using a cleaning rod or dowel so it upsets into the entire throat of the chamber. Remove the cartridge case and push the slug out of the chamber throat and you have the slug you need to measure to ensure proper fit. LBT sold, and probably still sells a kit with instructions on how to make this chamber/throat slug.
Good shooting! Pilgrim (a.k.a. Duane Bogen)