Upated: January 2014
© 2014 - Thomas C. Dugas
Hensley & Gibbs Handles
-- A note on separating handles from moulds
This article is a work in
progress and may be altered or changed in the future.
For years I have hesitated to
buy Hensley & Gibbs mould blocks that did not come with handles. As
noted in many of their catalogs, Hensley & Gibbs would sell mould blocks
when the buyer already owned a set of matching handles. For example, if a buyer
wanted another two cavity mould for a different caliber to complement the two
cavity block that he already owned, he could save a little money by purchasing
just the blocks, and switch the handles between the blocks. You could
even purchase the blocks without the sprue plate. I’ve seen this
primarily on 8 and 10 cavity blocks. I would never take the trouble, or
the risk of switching out sprue plates, but some buyers apparently felt
confident about doing this.
Thus, the problem that exists
today with blocks that are sold without handles. Often, blocks and
handles will be separated when sold, in order to maximize profit for the
seller. I generally did not see a problem with this practice until just
this year. After finally collecting all my Hensley & Gibbs catalogs
and publishing them on the website, I noticed that in one late issue catalog
Wayne Gibbs offered a new style two cavity mould. As stated in the
advertisement, these two cavity handles would interchange with any other two
cavity blocks of the same late
design as these! The new style two cavity handles are
much thicker in cross section that the old style handles. New style
handles will not fit the old style blocks. You can try and use old style
handles with new style blocks, but they may well be slop in the way they
fit. I think Wayne was attempting to standardize the two cavity handles
on the new design in order to maximize use of the blocks and handles. But
the new style handles are much thicker in cross section than the older style
two cavity handles. The new style thicker handles fit both 2 cavity and 4
cavity moulds and appear to be interchangeable (Two cavity handles (thick) will
fit four cavity moulds (thick) and vice versa.)
Unlike 2 cavity handles, the evolution of 6, 8, & 10 cavity handles
does not appear to change over the years. There is an exception, which I will
cover later. As a general statement, the thin (.250”) 4 cavity handles
from any time period appear to interchange with any 4 cavity block. There are two styles of 4 cavity handles over
the entire production, thin handles (.250”) and thick (.308”). I had not noticed a difference between 4
cavity handles until I examined all of my 4 cavity moulds and discovered
additional sets of thin and thick handles.
These “Thick and Thin” handles are covered in a
separate article, here
(Click link).
6, 8, and 10 cavity handles have the .250” slots exclusively. What does change on the 6, 8, & 10 cavity
handles is the hinge pin style. The earliest design of the hinge pin is a
hand made sealed capture pin (or rivet pin). I
have no idea what George Hensley called it, but it was clearly fabricated in
his shop. What is significant about these early style handles is that the
mould *cannot* open all the way like later production moulds, this style of
hinge pin only allows the mould to open to approximately 45 degrees. The final
design was a standard “shoulder bolt & nut” that appears on all mid and
late production 6, 8, & 10 cavity mould handles. This style of handle will
allow the mould to open almost 180 degrees.
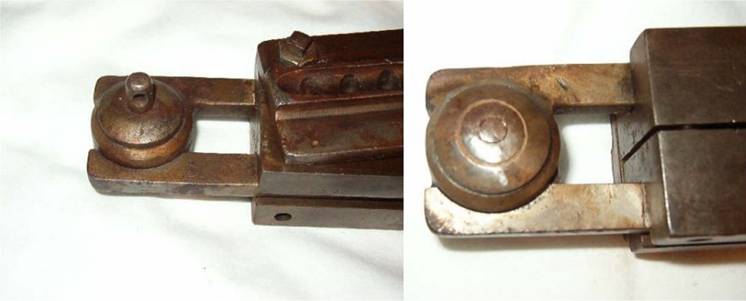
Here are photos of the old style hinge pin:
And here is Wayne Gibbs email
regarding the evolution of the hinge pin from early style to late style:
Email from Wayne Gibbs:
Tom--this may be a little difficult to verbalize text
wise, but here goes:
The portions of the handle that go into the slots
in the blocks need to be on the same plane, since that is where the slots
need to be located. The idea of this early style handle was to use 5/16"
thick by probably 1/2" wide flat steel stock. The problem comes
when you want to join the two for a hinging action. Round bar stock
was used and parted in a lathe to appropriate thickness, then these were welded to the handle tangs so their
center line was on the same center line as the tangs.
This left the round hinge-pieces half-way above and
below the tangs, as you can see in your photos. A threadless
"rivet" type bolt and a "washer" was turned, and
after a lot of grinding and smoothing was done on the welds the washer was
attached and the bolt was riveted over, then driven back to adjust the play in
the hinge action. One of the drawbacks of this way of building the handles
was the blocks could not be fully opened, which I did not like. My dad
said that after he personally fabricated some by this
method, he figured there had to be a less labor intensive way, so
they started using a standard bolt and nut, with 1/2" National Fine
threads. Also, George detested welding, and we really weren't set up for
welding, as we were actually in an enlarged garage which eventually wound up
being in the middle of a residential neighborhood in the middle of San Diego.
When George and his family first moved there, he hunted rabbits in the sage
brush around his house. Progress!
After this, the new style individual handles
were machined from 5/16" hot rolled steel. They were slit
to 5/8" width up to the hinge pivot area, then holes were drilled to
weaken the hinge circle area, this part was then broken off (using my arm,
a monkey wrench and a large vise did the trick)--
12 individual handles were mounted on a home-made spindle, and the metal shaper
was used to plane the circle. The parts were then ground and polished, then
heated red hot in a forge, then off-set bent in a jig (again, my arms and that
big Prentiss vise. Great for your shoulder muscles, but I'm sure it
weakened my mind) Then they had to be bent (heated red-hot again, then hit with
a sledge hammer to acquire proper spacing to fit into the block slots. Then
polish out the imperfections, then heat red hot for the third time to give a
nice blue for uniform appearance, tap and ream the mating handles, and
we were ready for final fitting.
Notice the cross hole near
the end of the projecting end of the rivet. You may already know this, [I
didn’t by the way, T.D.] but this was for the purpose of hanging the mold
from the ceiling via a chain to support the front end of the mold over the
casting bench while in use. We continued to use this cross-hole in the new
bolts for a bunch of years, until I noticed (I became the official repair
dude by default, I guess). Anyway, I realized that absolutely no
mold sent in for repair had signs of any use of this cross-hole, so
we discontinued its use, and absolutely no one noticed, so
apparently no one missed it at all!
I am going to state this as
my personal opinion and observation:
A buyer should make every
attempt to purchase mould blocks with handles to avoid any fitting issues
between blocks and handles.
I have decided to avoid
purchasing Hensley & Gibbs blocks that do not come with handles. I
have had to modify a few 6, 8, and 10 cavity handles to get them to fit
corresponding sized blocks, but I dislike doing this because of the risk of
irreversible damage to the handles.
Because of the website, many
sellers contact me for information regarding Hensley & Gibbs moulds, and in
each case I advise them to not separate the handles from the blocks. I
hope buyers encourage this behavior also.
Back to the Hensley & Gibbs Website