Bumping
By: John Goins/akabeagle
You will often hear the term “bumping” in bullet casting circles. Bumping is actually a form of swaging or forming lead under pressure. It is used in casting to change something in a design that’s not as you want it. It’s not an exact process as we do it with the sizer/lubricator as you’ll see. It may or may not work for you.
Back in the early 60s, CH (now CH/4D) made a single station press called the Swage-O-Matic. This little tool used specially made precision dies to form revolver bullets in copper half jackets from pure lead cores using the swaging process. Although CH-4D, Corbin and several other manufacturers still manufacture this equipment, it has kind of fallen out of favor in later years and is very seldom encountered anymore for pistol bullets.
Bench rest shooters and custom bullet makers still make jacketed bullets in this manner and it’s more popular than ever but we’re talking cast bullets here.
Back in 1962, a friend had a Swage-O-Matic with dies for a .358 diameter bullet but couldn’t afford half jackets. Another friend had a Lyman 358156 SWC mould that used gas checks but couldn’t afford gas checks at the exorbitant price of $5 per thousand. I was the caster and didn’t have anything but a few moulds and casting equipment and a sizer. You have to realize that in those days, all of us shooters were poorer than we are now. We pooled our resources. I cast and lubed 358156 bullets and we took them over to the fellow’s house with the swager and ran them through. This swaged a nice flat plain base on them and at the same time, hollow pointed them. We had an unlimited supply of bullets. We were in “hog heaven”.
That was my first actual experience with what casters today call “bumping”. Technically, it’s the use of pressure to mechanically reform the bullet.
There are several uses for bumping. There may be more but these are the ones that I commonly use.
1) Flattening round balls and swaging them out to the desired diameter for use in round ball loads.
2) Flattening the nose on a round nose or sharp nose bullet to allow use in a magazine tube on a lever action.
3) Expanding the nose of a cast bullet that is too small.
4) Swaging a gas check shank on a plain base bullet.
Bumping is done by several methods and depends on what you want out of the finished bullet and how much money you’re willing to spend for special dies to accomplish the task.
The bench rest shooters want their bullets just like baby bear’s porridge. Not too big and not too small but just right. They’re willing to spend big bucks for the dies to properly form the nose to the correct size and taper using an arbor press or large single stage press. Nice, but I don’t have the dollars and it would be a waste of time in my old Model 94 30/30. It never will bench rest competitive but I still enjoy punching bee…I mean beverage cans with it anyway.
Normally the bullet casters will use a lubricator/sizer for their efforts. I used the Lyman #450. The RCBS Lube-a-matic will work but mine’s loaned out right now to a fellow shooter.
Let
me take this opportunity to lay a note of warning on you. The sizer/lubricators were
not designed strong enough for bumping so use caution or you’ll bust something.
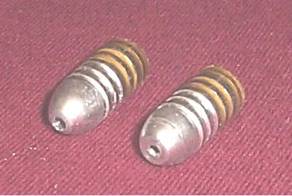
311465HP Bumped to a Flat Nosed
Configuration for Use in the 30/30
To bump the nose of a bullet flat, size your bullets in a normal manner. Then place a flat top punch in your lubricator. Put the bullet base first in the sizing die and applying light pressure, adjust the bottom stop down until the flange on the top punch is about 1/16” from the top of the die. Then slowly pull down on the handle. You’ll feel the nose of the bullet give as it deforms…this is the bump. Adjust the stop up and continue the process until you have the proper design you want. Now, there are problems associated with this process. Carried too far, the nose diameter will expand also as you have it in an unsupported condition so take it very slow and easy until you get the desired affect and still allow the bullet to seat. As I mentioned, there is distortion to this process so expect the bullet nose to change some. Whether it’s to your liking remains to be seen. Bench rest shooters spend big bucks on dies to get exactly what they want.
To bump the nose to a larger diameter and still maintain the shape, follow the same procedures except use a top punch that fits the nose of the bullet. Again, expect some nose distortion. It will not affect accuracy as much as you think, provided it’s uniform in nature and by that I mean, if there’s a ring around the nose, as long as it’s uniform, accuracy will not suffer significantly. If you’re expecting uniform looking bullets, pass this operation by unless you have specially made dies as the swaged nose metal has to go somewhere. Sometimes it’s not pretty as using regular sizing dies for the most part leaves the nose unsupported and free to choose its own form.
For the
next operation, you’ll need some special tools. You’ll need to make or
have made, a flat top punch. These can be made using 5/16” hex head bolts
turned down in a lathe, or if not available, a drill press or an electric drill
and a file. Turn the hex shape off the bolt head until it’s round.
Turn to several thousandths under the desired diameter you wish to size.
Cut off the bolt to the proper depth and turn it to approximately .260”.
This should fit in your lubricator in the place of the top punch. It is useful
for many tasks around the bench. I use the ones I make for sizing SWC and
FN cast bullets. They automatically level the bullet and you have no TP
ring to contend with due to improper TP fit. I also use them as a seating screw
as I have an M die modified to take TP’s as a seating screw. In the next
operation we’ll use it as a top punch.
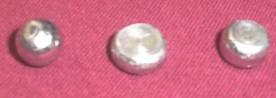
.375” Diameter Round Balls Bumped to a Larger Diameter
To bump round balls for use in ball or multiple-ball loads, you install the flat top punch and the desired diameter sizer. Drop the ball in the sizer with the sprue cut up. Then adjust the bottom stop in the same manner as for bumping a flat on the nose until the desired bump is achieved. This will normally be when you can see a flat on the edge of the ball that is about 1/8” high. The sprue cut will have been bumped flat.
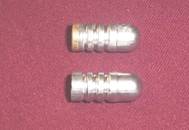
Lyman 358430 with Gas Check Shank
Bumped on Base for .38 Gas Check
(For Use in .35 Remington)
To bump a gas check shank on a plain base bullet requires special tooling. Many of us don’t have it or can’t make it. Orygun Mark has a rig that consists of a sizer body without the lube holes. It was bored .352” and then counter-bored .359” with a slight bevel to the .352” section. The top opening for the die was tapered slightly to allow slightly oversize bullets to enter. A special, close fitting top punch was made to avoid nose distortion that had a diameter of about .356”. This is set up in a sizer and a sized and lubed, plain-based bullet is run in base first. Then the correct bump is set up and he’s able to swage a gas check shank on the bullet that will take a regular gas check. This is a special application and very work intensive. We worked on it for a year or so until it worked. We wanted to use the many heavy, plain based .358 bullets with gas checks in the .35 Remington’s we have. Since then, we’ve discovered a simpler method and it will be discussed separately as it’s an entirely different process.
Other than the application and tools bench rest shooters use in bumping, it is a very inexact science. It is a makeshift operation and usually, you end up with more damaged and mangled bullets that good ones that you create.
On the other hand, us casters have never been known for accepting the old phrase, “It can’t be done”, and insist on trying anyway.
It will still be in use long after I’m gone.
Good bumping!
Back to the Casting Fellows Homepage